
The Complete Guide to Use a Pre-Roll Machine
From hand-packing your first tray to running thousands of cones per shift – everything you need to know about pre-roll machines, how they work, and how to get the most out of them.
There’s a moment every growing cannabis brand hits – the moment hand-rolling stops being charming and starts being a liability.
Maybe demand doubled. Maybe a retail account came in. Maybe you ran the math and realized your team was spending 30 hours a week on something a machine could do in two. Whatever the trigger, the question becomes the same: how do you scale pre-roll production without sacrificing quality? The answer, for thousands of brands across legal markets worldwide, is a pre-roll machine.
;But buying one isn’t enough. Understanding how to use it – really use it – is what separates operators running clean, consistent batches from operators constantly chasing rejects, weight variance, and downtime.
This guide covers everything: what pre-roll machines actually do, how they work step by step, what types exist, how to choose the right one, and how to dial in your process for maximum output and minimum waste.
What Is a Pre-Roll Machine?
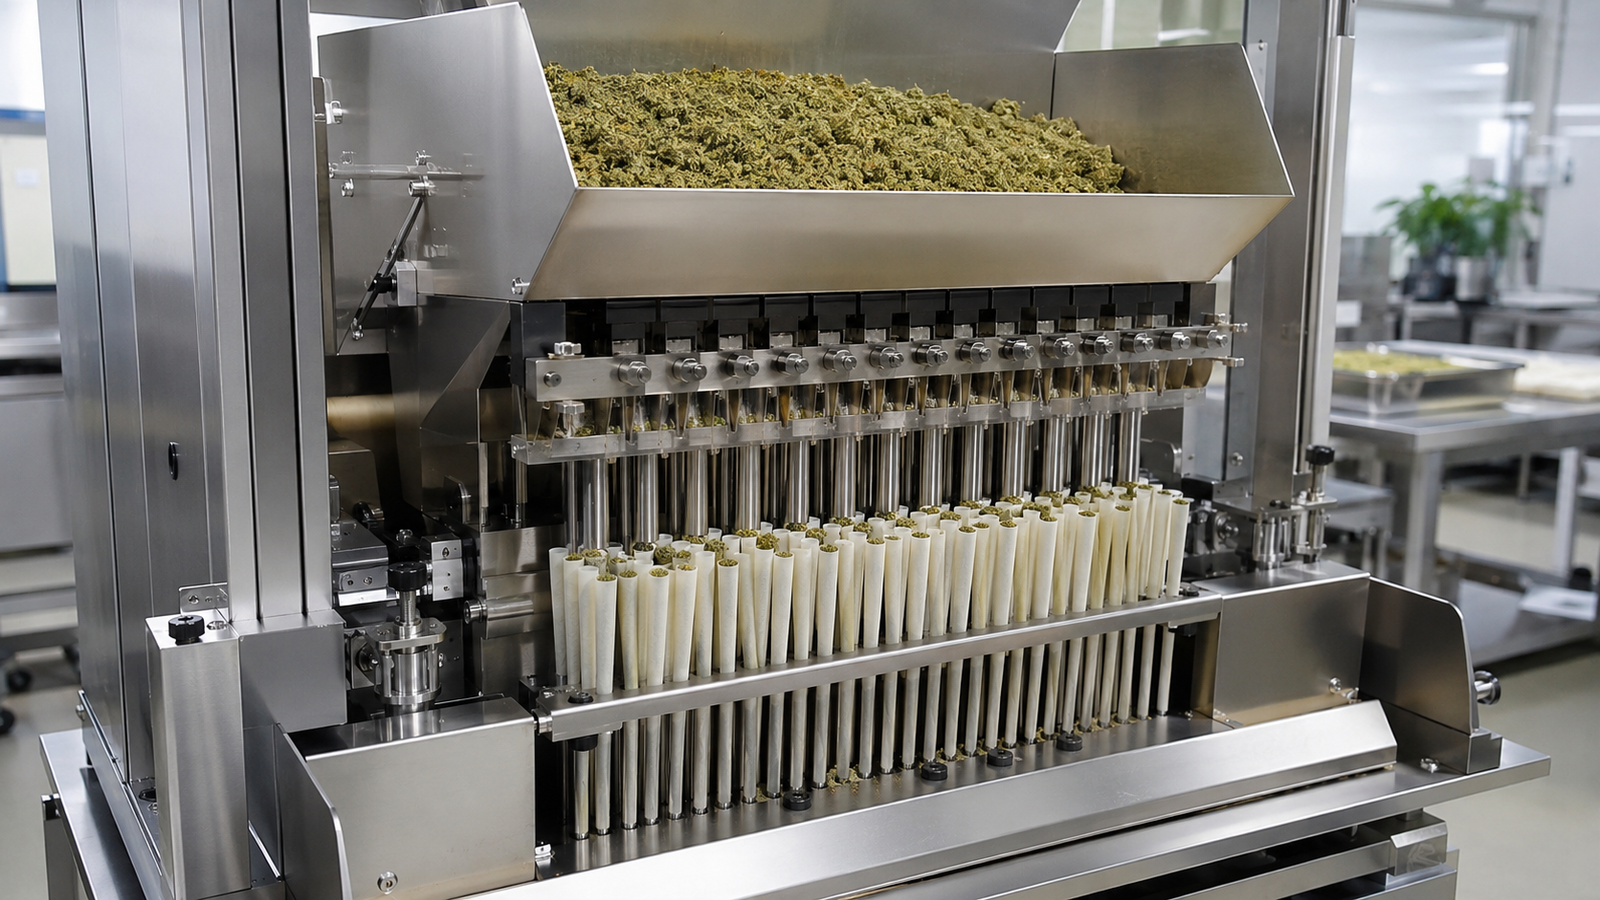
A pre-roll machine is production equipment that converts ground cannabis flower into finished joints or cones at a controlled, repeatable weight and pack density.
It automates the most labor-intensive steps in a pre-roll line:
- Grinding and sizing flower to a consistent particle size
- Dosing material to a target weight per cone
- Filling cones or tubes without air gaps or soft spots
- Settling the column so density is even throughout
- Closing the top via twist, tuck, or press
- Reject control for underfills, overfills, and loose packs
What used to require a team of rollers producing 100–150 cones per person per hour can now be handled by a single operator running a machine capable of thousands of cones per shift – with tighter weight tolerances and lower rework rates.
By the numbers: According to industry production benchmarks, a two-person hand-filling team caps out at roughly 240 cones per hour combined. A mid-tier automated filling system routinely hits 2,000–5,000 cones per shift with one operator. That’s a labor cost reduction of 80–90% per unit produced.
Pre-roll machines typically come in two configurations:
- Modular tray workflows – separate grinder, filler, scale, and closer that share a tray format and can be mixed and matched
- All-in-one integrated systems – more automation in a single frame, higher upfront cost, more maintenance dependence but fewer handoff points
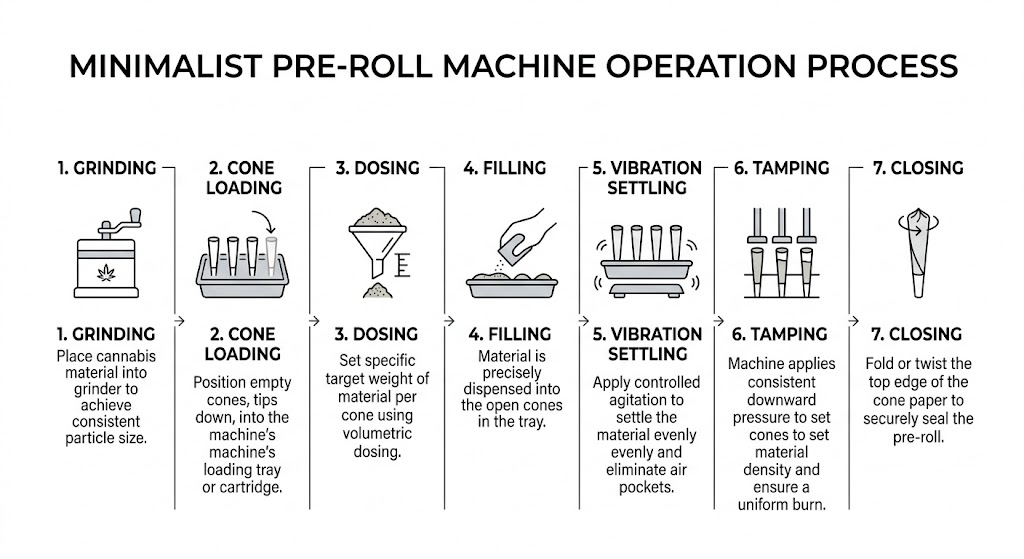
How Does a Pre-Roll Machine Work? (Step-by-Step)
Understanding the mechanics helps you troubleshoot problems before they become waste. Here’s what’s happening inside the machine on every cycle.
Step 1: Prep and Conditioning – The Grind Is Everything
Before material ever touches the machine, it needs to be properly prepared. This step is the most overlooked and the most consequential.
Why grind consistency matters so much:
- Too coarse: Material bridges in the hopper, fills unevenly, leaves air pockets mid-cone
- Too fine: Material compacts too tight, restricts airflow, causes draw issues and harsh burns
- Just right: A medium, fluffy grind settles uniformly under vibration, producing consistent density from cone to cone
Commercial inline grinders – like those designed to feed directly into filling trays – screen particle size mechanically, so you’re not relying on operator judgment batch to batch. If you’re still using hand grinders or repurposed food equipment upstream, that inconsistency will show up as weight variance and rework downstream.
Pro tip: Humidity matters more than most operators realize. Cannabis flower that’s too dry (below ~10% RH) crumbles into dust and overpacks. Too moist (above ~14% RH), and it clumps, won’t flow, and risks mold in sealed pre-rolls. Keep your trim room and staging area at 58–62% RH for optimal machine performance.
Step 2: Cone Staging and Loading
Empty cones are loaded into a tray or carousel and held vertically. A well-designed holder keeps each cone seated without splitting the paper during fill.
Key considerations at this stage:
- Cone format consistency – mixing cone sizes, brands, or paper weights within a single tray run causes uneven fills and jams. Lock in one format per run.
- Cone quality inspection – warped, creased, or off-center cones should be pulled before loading. One bad cone in a 100-slot tray doesn’t just waste product; it can knock adjacent cones out of alignment.
- Crutch/filter seating – if your cones include pre-inserted filters or crutches, verify they’re flush and firm before the fill cycle begins.
Step 3: Dosing to Target Weight
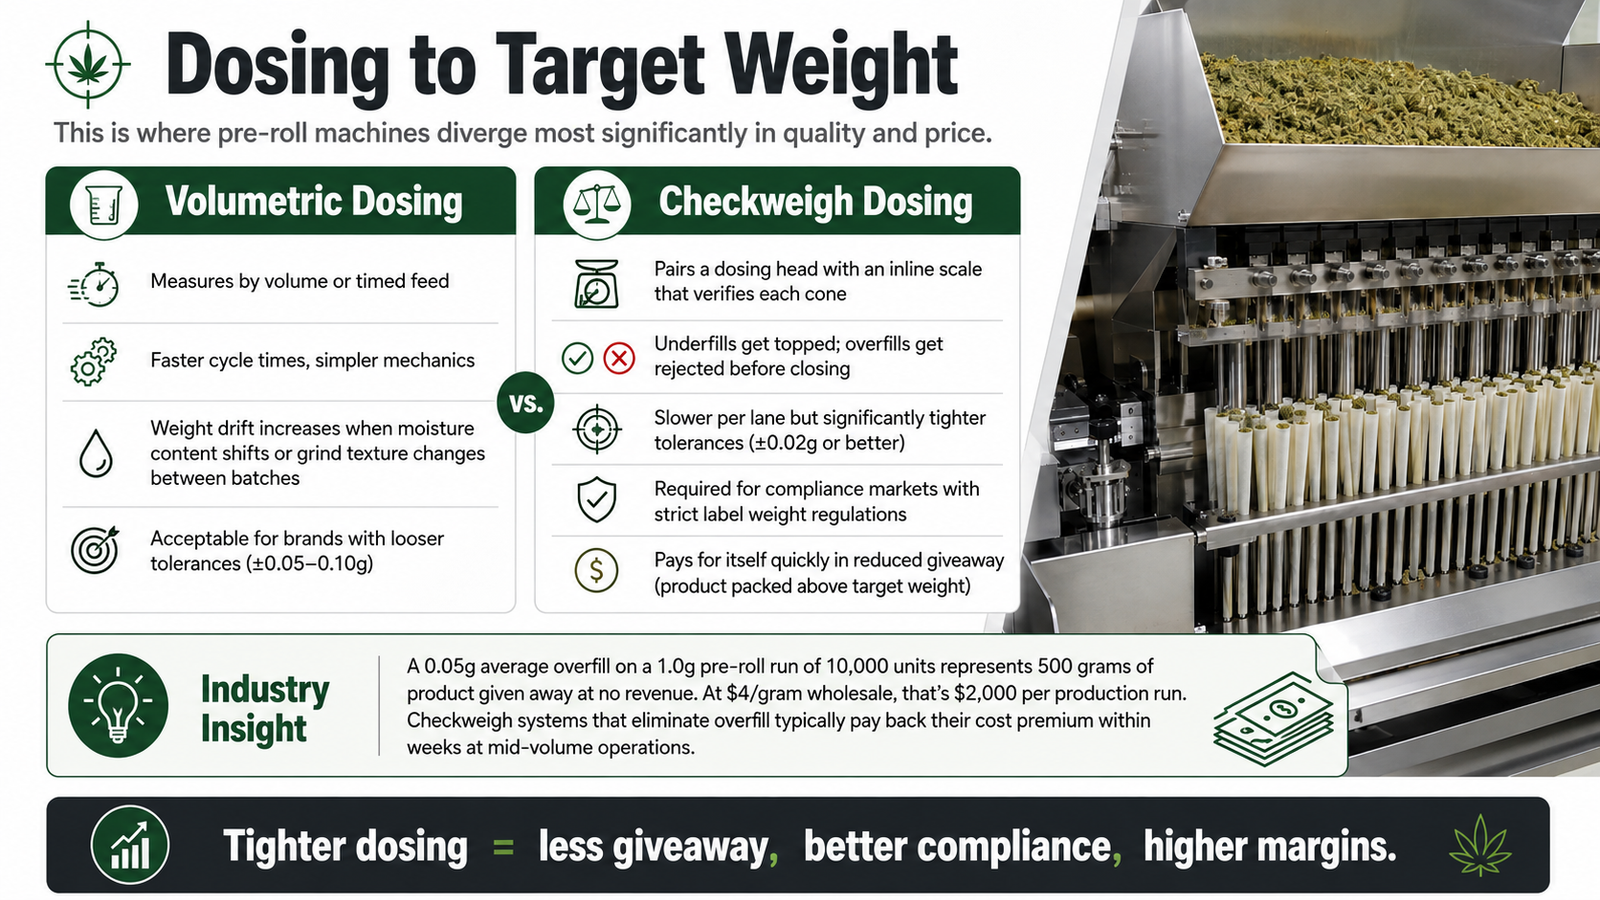
This is where pre-roll machines diverge most significantly in quality and price. There are two primary dosing methods:
Volumetric dosing
- Measures by volume or timed feed
- Faster cycle times, simpler mechanics
- Weight drift increases when moisture content shifts or grind texture changes between batches
- Acceptable for brands with looser tolerances (±0.05–0.10g)
Checkweigh dosing
- Pairs a dosing head with an inline scale that verifies each cone
- Underfills get topped; overfills get rejected before closing
- Slower per lane but significantly tighter tolerances (±0.02g or better)
- Required for compliance markets with strict label weight regulations
- Pays for itself quickly in reduced giveaway (product packed above target weight)
Industry insight: A 0.05g average overfill on a 1.0g pre-roll run of 10,000 units represents 500 grams of product given away at no revenue. At $4/gram wholesale, that’s $2,000 per production run. Checkweigh systems that eliminate overfill typically pay back their cost premium within weeks at mid-volume operations.
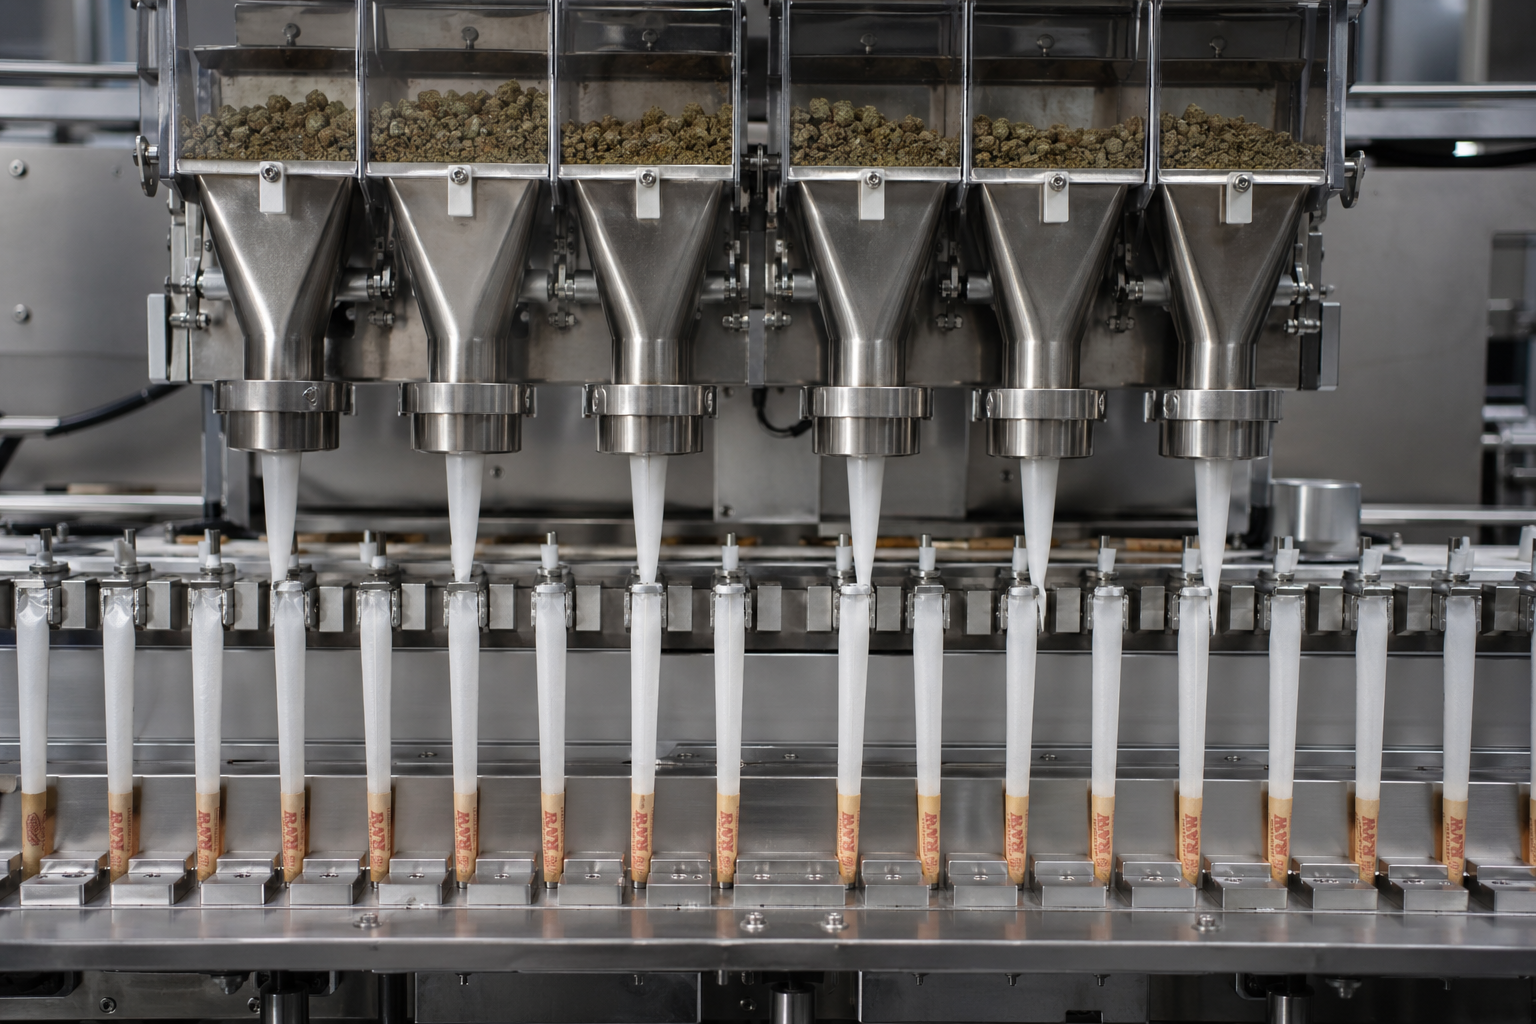
Step 4: Filling and Vibration Settling
Once dosed, material drops into the cone while a vibration mechanism settles the column. This step sets pack density and is the primary driver of burn consistency.
What happens without proper settling:
- Soft spots mid-cone that cause canoe burning (uneven combustion along one side)
- Post-pack weight drift as material redistributes after packaging
- Draw inconsistency across the same batch
Vibration frequency and duration are tunable on most commercial machines. Higher frequency settles denser; lower frequency produces a more open draw. Dialing in your machine’s vibration settings for your specific grind texture and target density is one of the most valuable calibration steps you can do.
Step 5: Tamp or Compression
Many machines add a tamp stroke after the vibration settle to lock the pack and ensure the top of the cone is flush and consistent. This step matters especially for:
- Infused pre-rolls – concentrate-coated or blended material behaves differently under vibration than straight flower; a tamp step compensates
- Longer cones – 1.0g+ formats where the vibration alone may not fully settle the column
- Retail presentation – a clean, firm top looks professional and signals quality to consumers
Step 6: Closing
A closing head twists, tucks, or presses the top paper closed. The method you choose affects both brand aesthetics and shelf durability:
- Twist close – classic look, fast, works well for most flower-only pre-rolls
- Fold/tuck – more secure, preferred for infused or heavier formats
- Press/crimp – used in automated high-volume lines for consistent mechanical closure
Step 7: Ejection, QC, and Rework Control
Finished pre-rolls eject into a bin or onto a conveyor. At this stage, operators:
- Pull random samples for weight verification and draw testing
- Track rejects by cause (underfill, overfill, loose pack, cone damage)
- Flag systematic issues before they affect the whole batch
Tracking reject causes – not just reject rates – is the difference between operators who fix problems and operators who live with them.
Types of Pre-Roll Machines: Matching Equipment to Volume
The right machine depends on your daily output target, cone format, weight tolerance requirements, and budget. Here’s the honest breakdown:
Manual and Bench Tools
Best for: 50–500 pre-rolls/day | Home use, micro-operations, R&D
Simple jigs, tamp sticks, and small cone loaders. Labor-intensive. Quality swings with staff consistency. Not scalable once you’re running two strains on the same table.
Semi-Automatic Tray and Tabletop Fillers
Best for: 500–5,000 pre-rolls/shift | Small-to-mid brands, dispensary production
One operator loads cones, the machine fills, then trays move to manual closing. Low cost entry into automation. Works well when you run one cone size most of the week. The Futurola Knockbox series and comparable tray fillers sit in this category – widely used, reliable, accessible.
High-Throughput Automatic Cone Filling Systems
Best for: 5,000–30,000+ pre-rolls/shift | MSOs, contract manufacturers, high-volume brands
Continuous filling with automated cone handling and faster cycles. Needs steady upstream prep – grinder output, cone staging – and enough staff to keep material and cones flowing. Downtime is more costly at this level; every stop burns 5–15 minutes of recovery and QC checks. Systems like the STM Canna RocketBox operate in this tier.
Fully Integrated Automated Lines
Best for: 30,000+ pre-rolls/shift | Industrial-scale operations
End-to-end automation from grinding through packaging. The highest upfront investment, but the lowest labor cost per unit at scale. These systems require dedicated maintenance staff and tight upstream supply chain consistency.
For brands operating at serious commercial scale – or planning to get there – purpose-built systems like the AuraX by Hefestus represent the next generation of the automatic joint rolling machine: designed for high throughput, tight weight tolerances, and minimal operator intervention. When every gram counts and every shift matters, the equipment ceiling becomes the production ceiling.
How to Use a Pre-Roll Machine: Operational Best Practices
Owning the machine is step one. Running it well is what actually drives ROI. Here are the practices that separate high-output operators from ones constantly chasing problems.
Before Every Run
1. Verify your grind Run a small batch through your grinder and check texture by hand. It should feel fluffy and uniform – no visible chunks, no powder. If moisture has changed overnight (common in facilities without humidity control), adjust grind time or grinder settings before filling trays.
2. Inspect cones Pull any visibly damaged cones before loading. One bad cone can misalign a tray slot and cause cascading fill errors.
3. Zero your scale (if checkweigh-equipped) Run a calibration check with a certified reference weight. Don’t assume last shift’s calibration held.
4. Clean contact surfaces Resin buildup on vibration trays, dosing heads, and cone holders changes flow behavior. A build-up of even 1–2mm on a dosing auger can shift fill weight measurably.
During Production
Monitor fill level visually on early trays. Don’t walk away from the first three runs of a new batch. Watch how the material flows and settles. If fills look uneven, stop and adjust before committing product to the whole run.
Track reject causes, not just rates. A 3% reject rate from underfills is a different problem than a 3% reject rate from cone damage. The first is a dosing calibration issue. The second is a handling or cone quality issue. Lumping them together hides the root cause.
Log weight samples. Pull 5–10 cones from each tray and weigh them. Record results. Weight drift that develops gradually over a shift points to resin buildup or moisture shift in the feed material – both fixable if caught early.
Between Runs and Strains
Full cleaning between strains. Residual terpene profiles, moisture content differences, and density variations between strains all affect machine behavior. Cross-contamination isn’t just a compliance issue – it changes how the next strain flows.
Check tray alignment after every format change. If you switch from 0.5g cones to 1.0g cones, verify the tray seating, cone holder depth, and dosing head position before running production volume.
End-of-Shift Maintenance
- Disassemble and clean all product-contact surfaces
- Inspect vibration mechanism for wear
- Check dosing head for wear or resin accumulation
- Log any jams, rejects, or anomalies from the shift
- Store clean trays in a humidity-controlled area
A machine that’s cleaned and logged after every shift runs predictably. One that isn’t will surprise you – always at the worst possible time.
Common Problems and How to Fix Them
| Problem | Likely Cause | Fix |
| Uneven fills across tray | Inconsistent grind, bridging in hopper | Screen grind, check hopper flow |
| Weight drift over shift | Resin buildup on dosing head | Clean contact surfaces mid-shift |
| Cones splitting during fill | Paper too dry, cone holder misaligned | Check humidity, realign holder |
| Soft spots mid-cone | Insufficient vibration settle | Increase vibration duration or frequency |
| Overfills on first few cones | Hopper surge on startup | Start with slower feed rate, then ramp |
| Machine jamming repeatedly | Grind too coarse or stems present | Screen upstream, check grinder output |
Choosing the Right Pre-Roll Machine: 5 Questions to Answer First
Before you buy, answer these:
1. What’s your daily output target – and what’s your growth target? Don’t buy for today’s volume. Buy for 18–24 months out. Undersizing means buying again in a year; oversizing means paying for capacity you don’t use.
2. What weight tolerances do you need to hold? If you’re in a compliance market with strict label weight requirements, volumetric dosing may not be sufficient. Understand your regulatory environment before spec’ing a machine.
3. How many cone formats do you run? Changeover time between sizes and strains is a real operational cost. If you run 3+ formats regularly, prioritize machines with fast, tool-free changeover.
4. What does your upstream look like? A high-throughput filler fed by inconsistent grind is still a high-reject line. The machine is only as good as what goes into it.
5. What’s your true cost of downtime? The cheapest machine often has the highest total cost of ownership when you factor in maintenance time, parts availability, and the output lost during repairs. Get references from current users before committing.
The Bottom Line
A pre-roll machine doesn’t just make production faster – it changes the nature of the operation. Quality control shifts from fixing every cone to sampling and spot-checking. Labor cost per unit drops dramatically. Consistency becomes a built-in feature rather than a function of who showed up to the shift.
But the machine is a system, not a solution. The grind upstream, the cone quality going in, the cleaning discipline, and the calibration habits of your operators – these are what determine whether you’re running clean, tight batches or constantly chasing problems.
Get the process right. Choose equipment sized to where you’re going, not just where you are. And treat every training investment in your team as seriously as the capital investment in the hardware.
That’s how high-volume pre-roll production actually works.